

The workspace
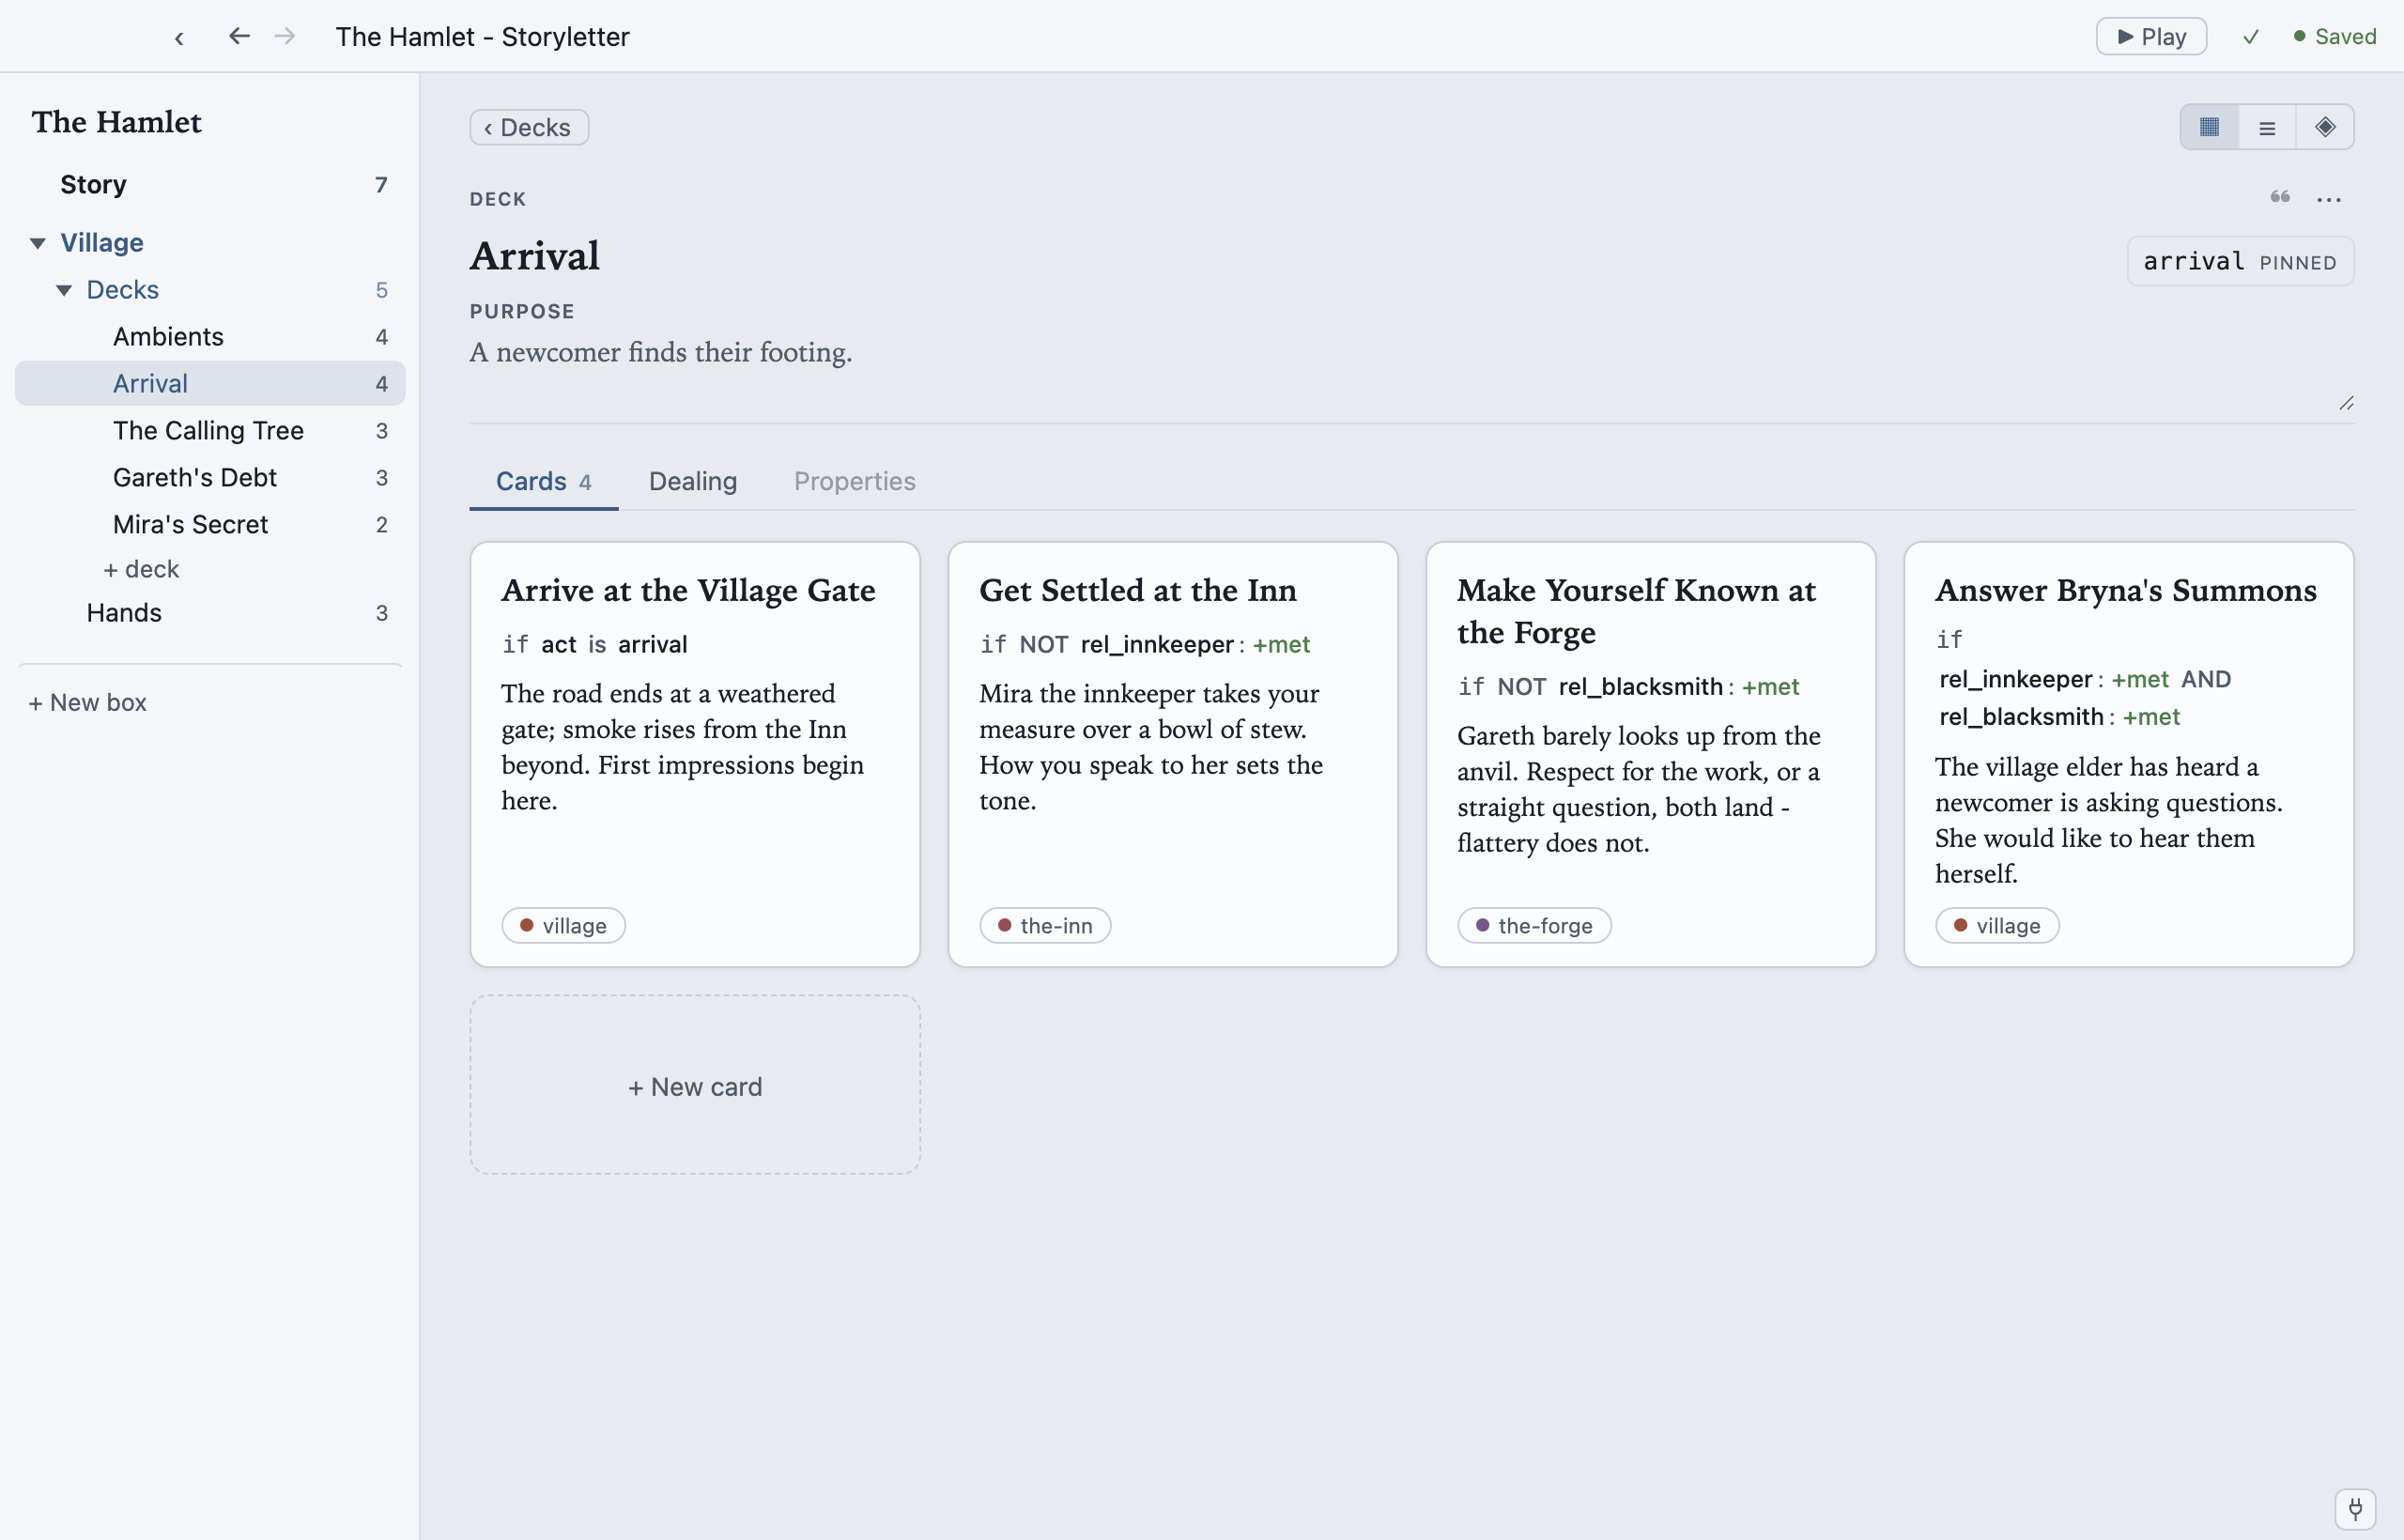
Storyletter has two panes: the navigator down the left, and the document you’re editing in the centre. A problems bar appears along the bottom only when something needs fixing.
The navigator
Section titled “The navigator”The navigator is a tree of containers. Every row has a chevron (or a space where one would be), a label, and a count:
The Hamlet ← the project Story 12 ← the @story properties Village ← a box Decks 5 Arrival 4 Gareth's Debt 3 ... Hands 4 + New boxThe tree stops at containers. Individual cards, hands, hand templates and tag groups don’t appear as rows; you arrange and sort those in the centre, which is also where their “+ New” buttons live. The navigator keeps only + deck and + New box.
Story sits above the boxes and opens the story’s own state: the @story properties
every designer shares, with the count showing how many are declared. It’s a document like
any other, and edits save as you make them. Expand a property’s row to give it a
purpose: one line saying what it’s for, which becomes the hover tip on that
property’s pills wherever a condition or outcome names it. (Your game’s @world
properties aren’t here; they’re a contract with the game and stay in
Project settings.)
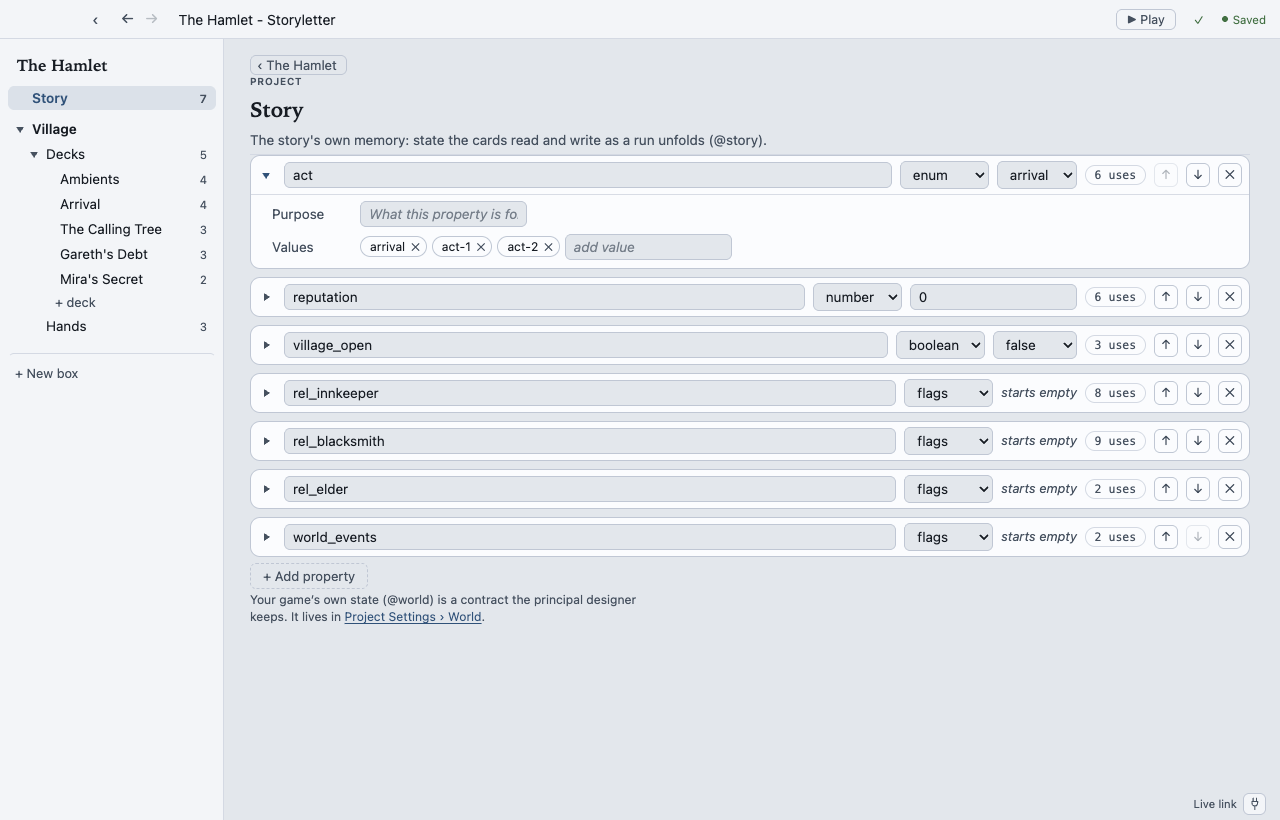
Each row also carries a quiet uses chip - the count of everything in the project that reads or writes the property - and clicking it opens Find on exactly that list. Worth a glance before renaming anything.
A box expands to Decks and Hands. Its setup (the card template, hand templates, tags and box properties) isn’t in the tree: it lives as tabs on the box’s own page.
- The chevron expands or collapses a row and never navigates. Clicking a label opens that document.
- Only chevron clicks are remembered. The path to whatever you have open expands while it’s open, so the tree doesn’t ratchet itself open over a week of work.
- The open document’s row is highlighted strongly, and each ancestor softly. When the open document has no row of its own (a card, a hand, a tag group), its nearest ancestor takes the strong highlight, so you can always see which deck you’re in.
Right-click a row for Duplicate and Delete. Drag to reorder. Toggle the pane with
View ▸ Show Navigator (Cmd+1).
Beside the toggle in the top bar sit a quiet ← → pair: Back and Forward
through the documents you’ve visited, each greyed when there’s nowhere to go. They’re
what rescues you after a jump (a Find hit, Go to definition, a warning click), and
they’re on View ▸ Back / Forward (Ctrl+Cmd+← / Ctrl+Cmd+→; Alt+← / Alt+→ on
Windows and Linux). Arrows retrace your steps; chevrons and Up a Level climb the
structure - two different journeys, two different symbols.
The document
Section titled “The document”The centre is where everything is edited. There’s no inspector pane: a container’s document lists its children, and a card’s document holds everything the card owns.
Every page opens with two things above its tabs:
- The trail: clickable ancestor segments (
Village › Decks). The current document is the heading beneath, not a segment. View ▸ Up a Level (Cmd+[) goes up one level. Page-level controls, like the card/table/node switch and the card stepper, sit to the right of the trail. - The identity heading: the item’s type, its title, its gameId as a chip (worked out from the title, or pinned), and its purpose. An overflow menu beside the type holds Delete.
Each kind of document has a fixed set of tabs:
| Document | Tabs |
|---|---|
| Box | Contents · Dealing · Card template · Hand templates · Tags · Properties (plus Maps when the box has one) |
| Deck | Cards · Dealing · Properties |
| Card | Dealing · Outcomes · Fields |
| Hand | Dealing · Slots · Properties |
| Hand template | Dealing · Bindings · Properties |
Dealing always holds how the thing gets dealt. A tab shows a count where one makes sense - a 0 included, so a dimmed tab reads as empty rather than disabled - and a tab with nothing in it stays clickable, with the explanation inside.
Your tab choice follows you between pages of the same kind: pick Outcomes on one card and the next card you open - from the navigator, a link, a coverage row - opens on Outcomes too, because moving card to card on the same tab is usually a comparison.
Two words are kept apart: Fields means card fields, declared by the box’s card
template and filled in on each card. Properties means the state declarations of a
scope (@box, @deck, @hand).
Each document remembers which tab you left it on.
Conditions
Section titled “Conditions”Everywhere a condition is edited, the label is When, with a hint saying whose condition it is: on a card, “the condition to be dealt”; on a deck, “the condition for any card in this deck”; on an outcome, “the condition for this outcome to be offered”.
Conditions and outcome changes are edited with a guided expression editor, not free text, so the property names on offer are the ones your project declares.
The problems bar
Section titled “The problems bar”Validation runs as you edit. When the project is clean there’s no bar at all, only a tick in the top bar.
When something is wrong, a one-line bar appears along the bottom: the count, and one problem at a time, named the way you think of it (“Burner Rig › Continue”, never a file path). The arrows step through, each step moving the view with it, and clicking the problem lands inside the thing itself - a problem about an outcome opens its card with that outcome expanded. Errors and warnings are told apart by colour, and a quick fix rides on the bar when one exists.
Coverage is a bigger job than validation, so it runs on demand (Review ▸ Coverage…) instead of live.
Edit ▸ Find… (Cmd+F) opens a small, pinnable Find window that floats over the
editor. Type to filter every navigable thing in the project (the field’s placeholder
says “Decks, cards, hands, tags…”). Picking a hit moves the editor underneath while the
window stays put, so you can step through hits without losing your place. Esc closes
it.
The window has three tabs across its top bar: Find, Replace and Property.
Replace (Edit ▸ Replace…, Cmd+Alt+F, or Ctrl+H on Windows and Linux) finds and
replaces text across the whole project: the titles and purposes of every box, deck, card,
outcome, hand, hand template and tag group, the project’s name, and the text fields on
cards. Type what to find and what to replace it with, and the list previews every match
as before → after, with where it lives. Replace all rewrites them all at once, after
asking you to confirm the count; the Replace button on a row does just that one.
It never touches conditions, changes, gameIds or ids, and a replace is one step in
Undo. If the card you’re editing is one of the matches, it shows the new text as soon
as the replace lands.
Property (Review ▸ Find Property Usage…) answers “where is @x used?”. Type a
property (@gold, @story.act, @world.time_of_day; a bare name matches it in any
scope) and the list shows every place it’s read (a card’s condition, a deck’s gate, a
hand’s condition, an outcome’s condition) and every place it’s written (an outcome’s
change), each row
saying reads or writes and naming the outcome that writes. Pick a row to go
there. The Coverage window’s “gated on @x” links open
this tab on that property.
The menus
Section titled “The menus”Every key below is collected, along with the canvas and tool-window keys the menus can’t show, on Keyboard shortcuts.
| Menu | Items |
|---|---|
| Storyletter (macOS only) | About Storyletter · User Information… |
| File | New Project… (Cmd+N) · Open Project… (Cmd+O) · New Card (Shift+Cmd+N) · Save (Cmd+S) · Open Recent · Project Settings… (Cmd+,) · User Information… (Windows and Linux) · Close Project · Open Storyletpack… · Export as Storyletpack… · Merge Returned Storyletpack… |
| Edit | Undo (Cmd+Z) · Redo (Shift+Cmd+Z) · Duplicate (Cmd+D) · Cut · Copy · Paste · Select All · Find… (Cmd+F) · Replace… (Cmd+Alt+F; Ctrl+H on Windows and Linux) |
| Play | The Board (Cmd+T) · Live Link |
| Review | Review Feedback (Shift+Cmd+R) · Next Feedback (F8) · Previous Feedback (Shift+F8) · Coverage… (Shift+Cmd+C) · Links… · Find Property Usage… · Show Resolved Comments |
| Publish | Publish Playable HTML… · Publish Spreadsheet… · Publish Bundle (Shift+Cmd+B) · Auto Rebuild |
| View | Show Navigator (Cmd+1) · Back · Forward · Up a Level (Cmd+[) · Project Overview · Reset View · Coverage Overlay · Colour Theme |
| Help | Storyletter Documentation · Storylet Studio Documentation Home · Check for Updates… · About Storyletter (Windows and Linux) |
A few notes:
- Undo and Redo reverse any edit to any kind of item, through the same version-control path a save takes, not just the text field you’re in.
- Publish Playable HTML… writes one self-contained
.htmlfile that plays the project in any browser, with no engine, server or install: the Board, with the player’s place saved in that browser. See a playable page. - Publish Spreadsheet… writes the whole project as an Excel workbook, one sheet per deck plus Outcomes, Hands and Tag groups, for a review meeting or a producer’s filter. See a spreadsheet of the whole project.
- Auto Rebuild is off by default. Turn it on and the bundle re-exports a moment after
your edits settle, so the
.storyletscon disk never goes stale. - Project Overview opens the project’s own page. Clicking the project name in the top bar does the same.
- Coverage Overlay tints the node canvas and maps by how much play reached each card or site in your last coverage run. See Coverage testing.
- A ▶ Play button in the top bar opens the Board, the same as
Cmd+T. - Live Link starts a loopback link to a running game: saving pushes the fresh bundle into the game, and the game streams its run back for the Board to watch. A connect chip in the bottom-right corner shows the state (the menu item just toggles the same thing). See Live Link.
Project settings
Section titled “Project settings”File ▸ Project Settings… (Cmd+,) opens a dialog with three sections:
- General: the project’s name and version, and one warning switch: Warn about unread state also flags state an outcome writes that no condition reads. It’s off by default, because cards are often written ahead of the content that will read them; a gate on state nothing writes always warns, whatever this says.
- World: the
@worldproperty declarations (your game’s state), and the coverage drivers that stand in for them during a test run. - Export: the bundle path, whether metadata is
fullorstripped, and how many turns a play advances.
Every property list in the app is the same control, and the editor for a value follows its type: boolean and enum values are pickers, not free text.
(The @story properties aren’t in this dialog: they live behind the navigator’s
Story row, as a document of their own.)
Themes
Section titled “Themes”Four palettes under View ▸ Colour Theme, plus Follow System: Chambray (light) and Indigo (dark) are the defaults, in blue-grey; Linen and Baize are their green-tinted predecessors, kept for anyone who prefers them. Follow System switches between Chambray and Indigo with your OS. Every window and dialog follows the theme, including the Board, Find and Coverage, and switching between same-lightness palettes never recolours your tags, decks or canvas furniture: those colours are your content’s, not the theme’s.
Review ▸ Links… opens the Links window: the card you have open in the middle, what can turn it on or off to the left, and what it turns on or off to the right, across every deck and box.
The window follows whatever card the editor has open, so it can sit open beside you. Click a neighbour to centre on that card instead and walk the graph, or double-click to open it in the editor. Once you’ve walked somewhere, Follow the editor hands the window back to following the editor.
Each row says which property joins the two cards and which outcome writes it, so seeing both “opens” and “shuts” between the same pair is normal: one outcome raises the value and another lowers it.
All of it comes from conditions and outcomes alone, with no playthrough. The same
analysis runs on the command line as storyletengine links, with the same
limit: @hand state is put together per deal, so links through hand scope aren’t worked
out.
MIT-licensed open source · Made by Ian Thomas · storylet.studio